【css】コピペOK!ボタンデザインまとめ
この記事を書いている人
前回は、デザインする時の参考になる、見出しをまとめてみました。⇨シンプルな見出しのデザインをまとめました
今回は、同じく参考にできるようにシンプルなボタンのデザインをまとめてみました^^
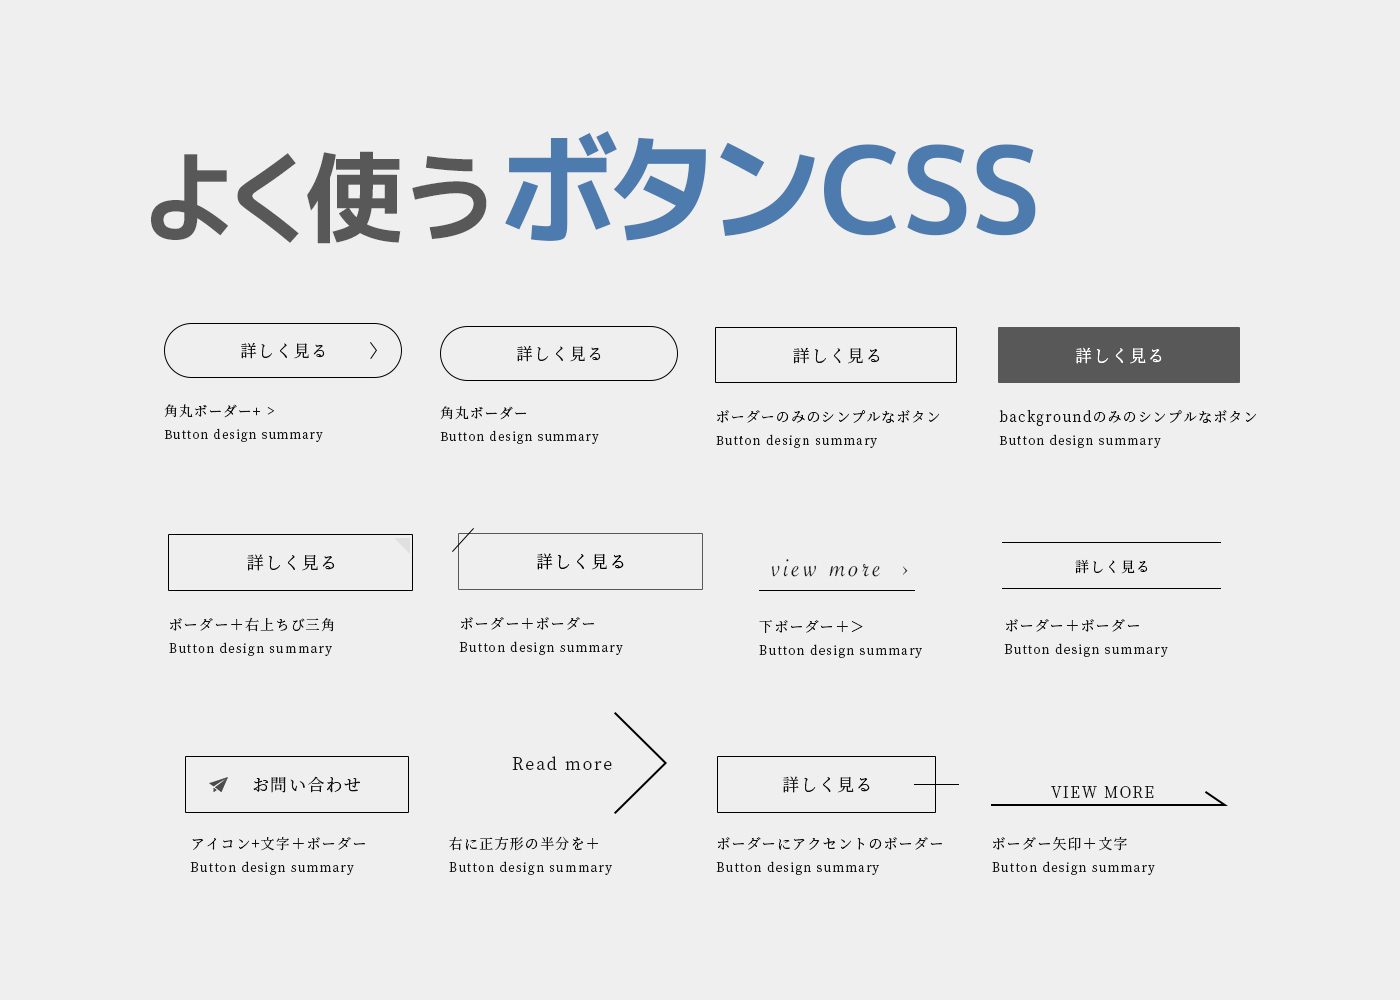
- ボタンデザインだけ
- ボーダーのみのシンプルなボタン
- backgroundのみのシンプルなボタン
- ボーダーにアクセントのボーダー
- アイコン+文字+ボーダー
- 右に正方形の半分を+
- ボーダー矢印+文字
- 角丸ボーダー
- ボーダー+右上ちび三角
- ボーダー+ボーダー
- 下ボーダー+>
- 上下ボーダー
- 線がちょっとずれたボーダー
[目次]
ボタン clickでcssコードに飛びます
ベースのCSSをコピーした後に、各ボタンのCSSを追加してください。
ボタンデザインだけ
サイトデザインまとめはよくあるけど、ボタンだけのまとめって中々ないですよね。
ボーダーの位置や長さを変えるとピックアップした以外にもアレンジは色々できると思います♫
シンプルな中でも少し遊び心が出せるようなボタンだと楽しいですね💗
ボーダーのみのシンプルなボタン
<div class="btn">
	<a href="#">詳しく見る</a>
</div>
こちらのcssがベースになります↓
.btn {
	font-size: 14px;
	border: 1px solid #666;
	text-align: center;
	max-width: 200px;
	margin: 20px auto;
	font-family: 'Noto Serif JP', serif;
}
.btn a {
	color: #666;
	display: block;
	width: 100%;
	height: 100%;
	padding: 10px;
	box-sizing: border-box;
}
このボタンをベースにして、カスタマイズしていきますね。
class="btn"に追加で別classを適用していきます。
コピペする場合は、↑のcssに追加で↓cssをプラスしてください。
backgroundのみのシンプルなボタン
<div class="btn btn2">
	<a href="#">詳しく見る</a>
</div>
.btn2 {
background: #666;
}
.btn2 a {
color: white;
}ボーダーにアクセントのボーダー
<div class="btn btn3">
	<a href="#">詳しく見る</a>
</div>
.btn3 {
position: relative;
}
.btn3::before {
content: "";
display: block;
width: 60px;
height: 1px;
background: #666;
position: absolute;
top: 0;
bottom: 0;
right: -30px;
margin: auto;
}アイコン+文字+ボーダー
<div class="btn btn4">
	<a href="#">詳しく見る</a>
</div>
.btn4 a::before {
content: '\f1d8';
font-family: 'fontawesome';
font-weight: 900;
margin-right: 20px;
}アイコンフォント、Font Awesomeを利用しています。
右に正方形の半分を+
<div class="btn btn5">
	<a href="#">Read more</a>
</div>
.btn5 {
position: relative;
border: none;
letter-spacing: .2em;
margin-top: 60px;
}
.btn5::before {
content: "";
display: block;
width: 60px;
height: 60px;
border-right: 1px solid #666;
border-bottom: 1px solid #666;
rotate: -45deg;
position: absolute;
right: 0;
top: -10px;
}ボーダー矢印+文字
<div class="btn btn6">
	<a href="#">VIEW MORE</a>
</div>
.btn6 {
position: relative;
border: none;
border-bottom: 1px solid #666;
width: 300px;
max-width: 90%;
}
.btn6::before {
content: "";
display: block;
width: 30px;
height: 1px;
background: #666;
rotate: 40deg;
position: absolute;
right: -3px;
bottom: 9px;
}角丸ボーダー
<div class="btn btn7">
	<a href="#">詳しく見る</a>
</div>
.btn7 {
border-radius: 25px;
}角丸ボーダー+ >
<div class="btn btn8">
	<a href="#">詳しく見る</a>
</div>
.btn8 {
border-radius: 25px;
position: relative;
}
.btn8 a::after {
content: "";
display: block;
position: absolute;
background-image: url('arrow.png');
background-size: 100%;
width: 7px;
height: 17px;
top: 0;
bottom: 0;
right: 10px;
margin: auto;
}ボーダー+右上ちび三角
<div class="btn btn9">
	<a href="#">詳しく見る</a>
</div>
.btn9 {
position: relative;
}
.btn9::before {
content: "";
border: 14px solid transparent;
border-top: 0 solid #e0e0e0;
border-right: 14px solid #e0e0e0;
position: absolute;
top: 3px;
right: 3px;
}ボーダー+ボーダー
<div class="btn btn10">
	<a href="#">詳しく見る</a>
</div>
.btn10 {
position: relative;
}
.btn10::before {
content: "";
width: 30px;
height: 1px;
background: #666;
rotate: -45deg;
position: absolute;
left: -10px;
top: 5px;
}下ボーダー+>
<div class="btn btn11">
	<a href="#">view more</a>
</div>
.btn11 {
position: relative;
border: none;
border-bottom: 1px solid #666;
width: fit-content;
}
.btn11 a::after {
content: ">";
margin-left: 20px;
}上下ボーダー
<div class="btn btn12">
	<a href="#">view more</a>
</div>
.btn12 {
border: none;
border-top: 1px solid #666;
border-bottom: 1px solid #666;
}線がちょっとずれたボーダー
<div class="btn btn13">
	<a href="#">view more</a>
</div>
.btn13 {
border:none;
position:relative;
}
.btn13::before {
content: "";
width:30px;
height: 1px;
background:#000;
display:block;
position:absolute;
top:0;
left:-5px;
}
.btn13 a::before {
content: "";
width:1px;
height: 30px;
background:#000;
display:block;
position:absolute;
top:-5px;
left:0;
}
.btn13::after {
content: "";
width:30px;
height: 1px;
background:#000;
display:block;
position:absolute;
bottom:0;
right:-5px;
top:auto;
}
.btn13 a::after {
content: "";
width:1px;
height: 30px;
background:#000;
display:block;
position:absolute;
bottom:-5px;
right:0;
top:auto;
}三角形が右下にあるボタン
<div class="btn btn14">
 <a href="#">view more</a>
</div>
.btn14::before {
content: "";
background:none;
width: 0;
height: 0;
border-style: solid;
border-width: 0 0 15px 15px;
border-color: transparent transparent #666 transparent;
transform: rotate(0deg);
position:absolute;
bottom: 3px;
right: 3px;
}ボーダーの上のボタン
<div class="btn btn15"><a href="#">view more</a></div>.btn15 {
position: relative;
background:none;
}
.btn15 a {
background:white;
}
.btn15::after {
content: "";
display: block;
width: 100%;
height:100%;
position:absolute;
right: -6px;
bottom: -10px;
background: repeating-linear-gradient(135deg, #666, #666 3px, transparent 3px, transparent 7px);
z-index: -1;
}ボタンはマウスホバー時にアニメーションを設定しやすいですよね。
アイデア次第でオリジナルボタンを作ることもできると思います♫
ホバーエフェクト参考記事
基本のホバーエフェクトはこちら↓
変わり種ホバーエフェクトボタン↓
いいなと思ったら
TAPしてね♡↓
【css】擬似要素before&afterを使って装飾ボーダーを作る方法 「デザイン」のゴールはどこにあるのか?


コメントは承認後に表示されます。